1. Configuring your computer for class#
The follow instructions guide you through setting up your personal computer (macOS/linux or Windows) for class. This process might be a bit frustrating at first, but it’s important to get right and you only have to do it once!
Note
If you’re unable to get your computer configured by the end of Lab 1, or the end of this week (Jan 10th), please contact your instructors on Slack and we’ll either help you trouble shoot or provide an alternative setup option.
1. Initial setup#
First make sure you already have an existing GitHub account. Then after logging in you’ll want to create a passkey for your account. This will allow you to login into your account from your computer’s terminal without entering a password.
Next we’ll want to make sure that git is installed and setup on your computer. Pick the instructions based on your computer’s operating system and open up a Terminal (macOS) or Command Prompt/PowerShell (windows):
Install the Homebrew package manager or check if you have it installed
which brewInstall the latest version of
gitby runningbrew install gitInstall the github CLI by running
brew install gh
Check if you have
gitinstalled by runninggit --versionIf not, install it using the instructions here
Install the github CLI by running
winget install --id github.cli
Finally we’ll want to configure git with your github account. Make sure your username matches your Github userid and your email matches the email you used on Github:
Configure your git username by running
git config --global user.name "your-name"Configure your git email by running
git config --global user.email "your-email"Authenticate to github by running
gh auth loginand entering the passkey you generated earlier
🥳: Now you should be able to push/pull from your github account using the command line!
2. Python setup#
Next we’ll setup Python on your computer. While most computers come with Python installed, it’s important that we don’t “mess with” your computer’s default Python installation. Instead, we’ll use a popular Python package manager called Miniconda which will allow us to create, manage, and install packages into isolated Python environments. This is important for a few reasons:
You can have multiple Python environments on your computer, each with their own set of packages and dependencies, e.g. if you’re working on different projects with different needs.
It allows you and others to more easily perform reproducible research
First follow the Miniconda setup instructions here for your computer’s OS. Make sure to follow the directions for either the macOS terminal OR windows command prompt/powershell, not the graphical installer/website! You can then verify the installation by running conda env list your terminal. You should notice a “base” environment listed, which is the default Python environment that comes with your installation.
Next we’re going to create a new Python environment for the class:
conda create --name 201b -c ejolly -c conda-forge -c defaults pymer4
If that command doesn’t work (windows 😠?) try this instead:
conda create --name 201b -c conda-forge -c defaults python=3.11 pandas numpy seaborn matplotlib patsy joblib scipy scikit-learn
Next activate the environment by running conda activate 201b. You should see (201b) appear in your terminal prompt. You should also be able to verify that the python command is now pointing to the new environment by running which python (macOS) or where python (windows) in your terminal.
🥳: If you see a path that includes 201b you’re all set!
Tip
Conda can be a little confusing to get used to at first and we won’t spend too much time on it in class. But we’ve linked to some additioanl resources including a command references in the cheatsheets section!
3. Coding environment setup#
You should choose between 2 recommended options for your coding setup. Below we’ll discuss the pros and cons of each and how to get started with them:
Jupyterlab#
Jupyterlab is an interactive data-analysis environment similar to Rstudio. It’s a bit more beginner friendly and comes with useful configurations and extensions that make it easier to work with data in Python.
To install it, make sure you’ve activated your class environment and run conda install -c conda-forge jupyterlab. Once complete, you can launch Jupyterlab by running jupyter lab in your terminal. This will always open a new tab in your web-browser with the working directory set to wherever you ran the command from.
From the interface you can: browse files, create/edit .py files (Python scripts), create/edit .ipynb files (Jupyter notebooks), and more.
🥳: You’re ready to move onto the next part of the lab!
Quick steps to remember when using Jupyterlab:
Open a terminal and navigate to the folder you want to work in (where your
.ipynbfiles are)Activate your class environment by running
conda activate 201bLaunch Jupyterlab by running
jupyter labin your terminalDouble click any
.ipynbfile in the file list to open it!
Visual Studio Code[1]#
VSCode is a popular, general-purpose IDE (integrated-development-environment) that runs as a standalone application on your computer. It’s a bit more advanced than Jupyterlab, but it’s also more powerful and customizable. It’s the preferred way that Eshin likes to work with Python as well as other langauges (e.g. Javascript, bash, R, etc). It also has free access to Github Copilot, a GenAI tool built right into VSCode, as well as tight integration with Github (e.g. changes, commits, push/pulls, etc).
To install VSCode, we’ll first install a package in the class environmen that will make it “visible” to VSCode. After activating your class environment run pip install ipykernel. Then visit the VSCode download page and follow the instructions for your computer’s OS. Once installed, you can open the app like you would any other app on your computer.
Optionally, you can launch VSCode by running code in your terminal. To do so, open VSCode and open the Command Palette by running cmd+shift+p (macOS) or ctrl+shift+p (windows). Search for Shell Command: Install 'code' command in PATH command., then click that.
After launching VSCode bring up the command palette by using the keyboard shortcut: cmd+shift+p (macOS) ctrl+shift+p (windows). The command palette is your best friend for running any types of commands in VSCode. For now search for and select “install code command” in the command palette. This will allow you to launch quickly open VSCode from the terminal using your current working directly by typing code . or code path/to/folder.
VSCode’s power lies in its extensive library of extensions. Using the links below, we’ll give VSCode the ability to understand Python, jupyter notebook files (.ipynb), and give us some nice auto-complete and error-checking functionality. Simply click each link below to open the extensions website select the bing green “Install” button. Clicking it will automatically point VSCode to the extension and give you the option to install it:
Finally let’s make sure everything is working by creating a new blank notebook and choosing the Python environment/kernel we created. Use VSCode’s command palette to search for and select “new jupyter notebook”. This will create a new blank notebook in the folder you’re currently in called something like Untitled.ipynb. In the top right of the notebook, click on the “choose kernel” button > Python environments > and choose 201b. If that worked you can close this notebook without saving it!
🥳: You’re ready to move onto the next part of the lab!
Quick steps to remember when using VSCode:
Open your terminal and navigate to the folder you want to work in (where your
.ipynbfiles are)Type
code .to open VSCode with that folder loadedDouble click any
.ipynbfile in the file list to open itUse the dropdown menu in the top right to select
201bas the kernel, if it’s already selected
VSCode vs Jupyterlab#
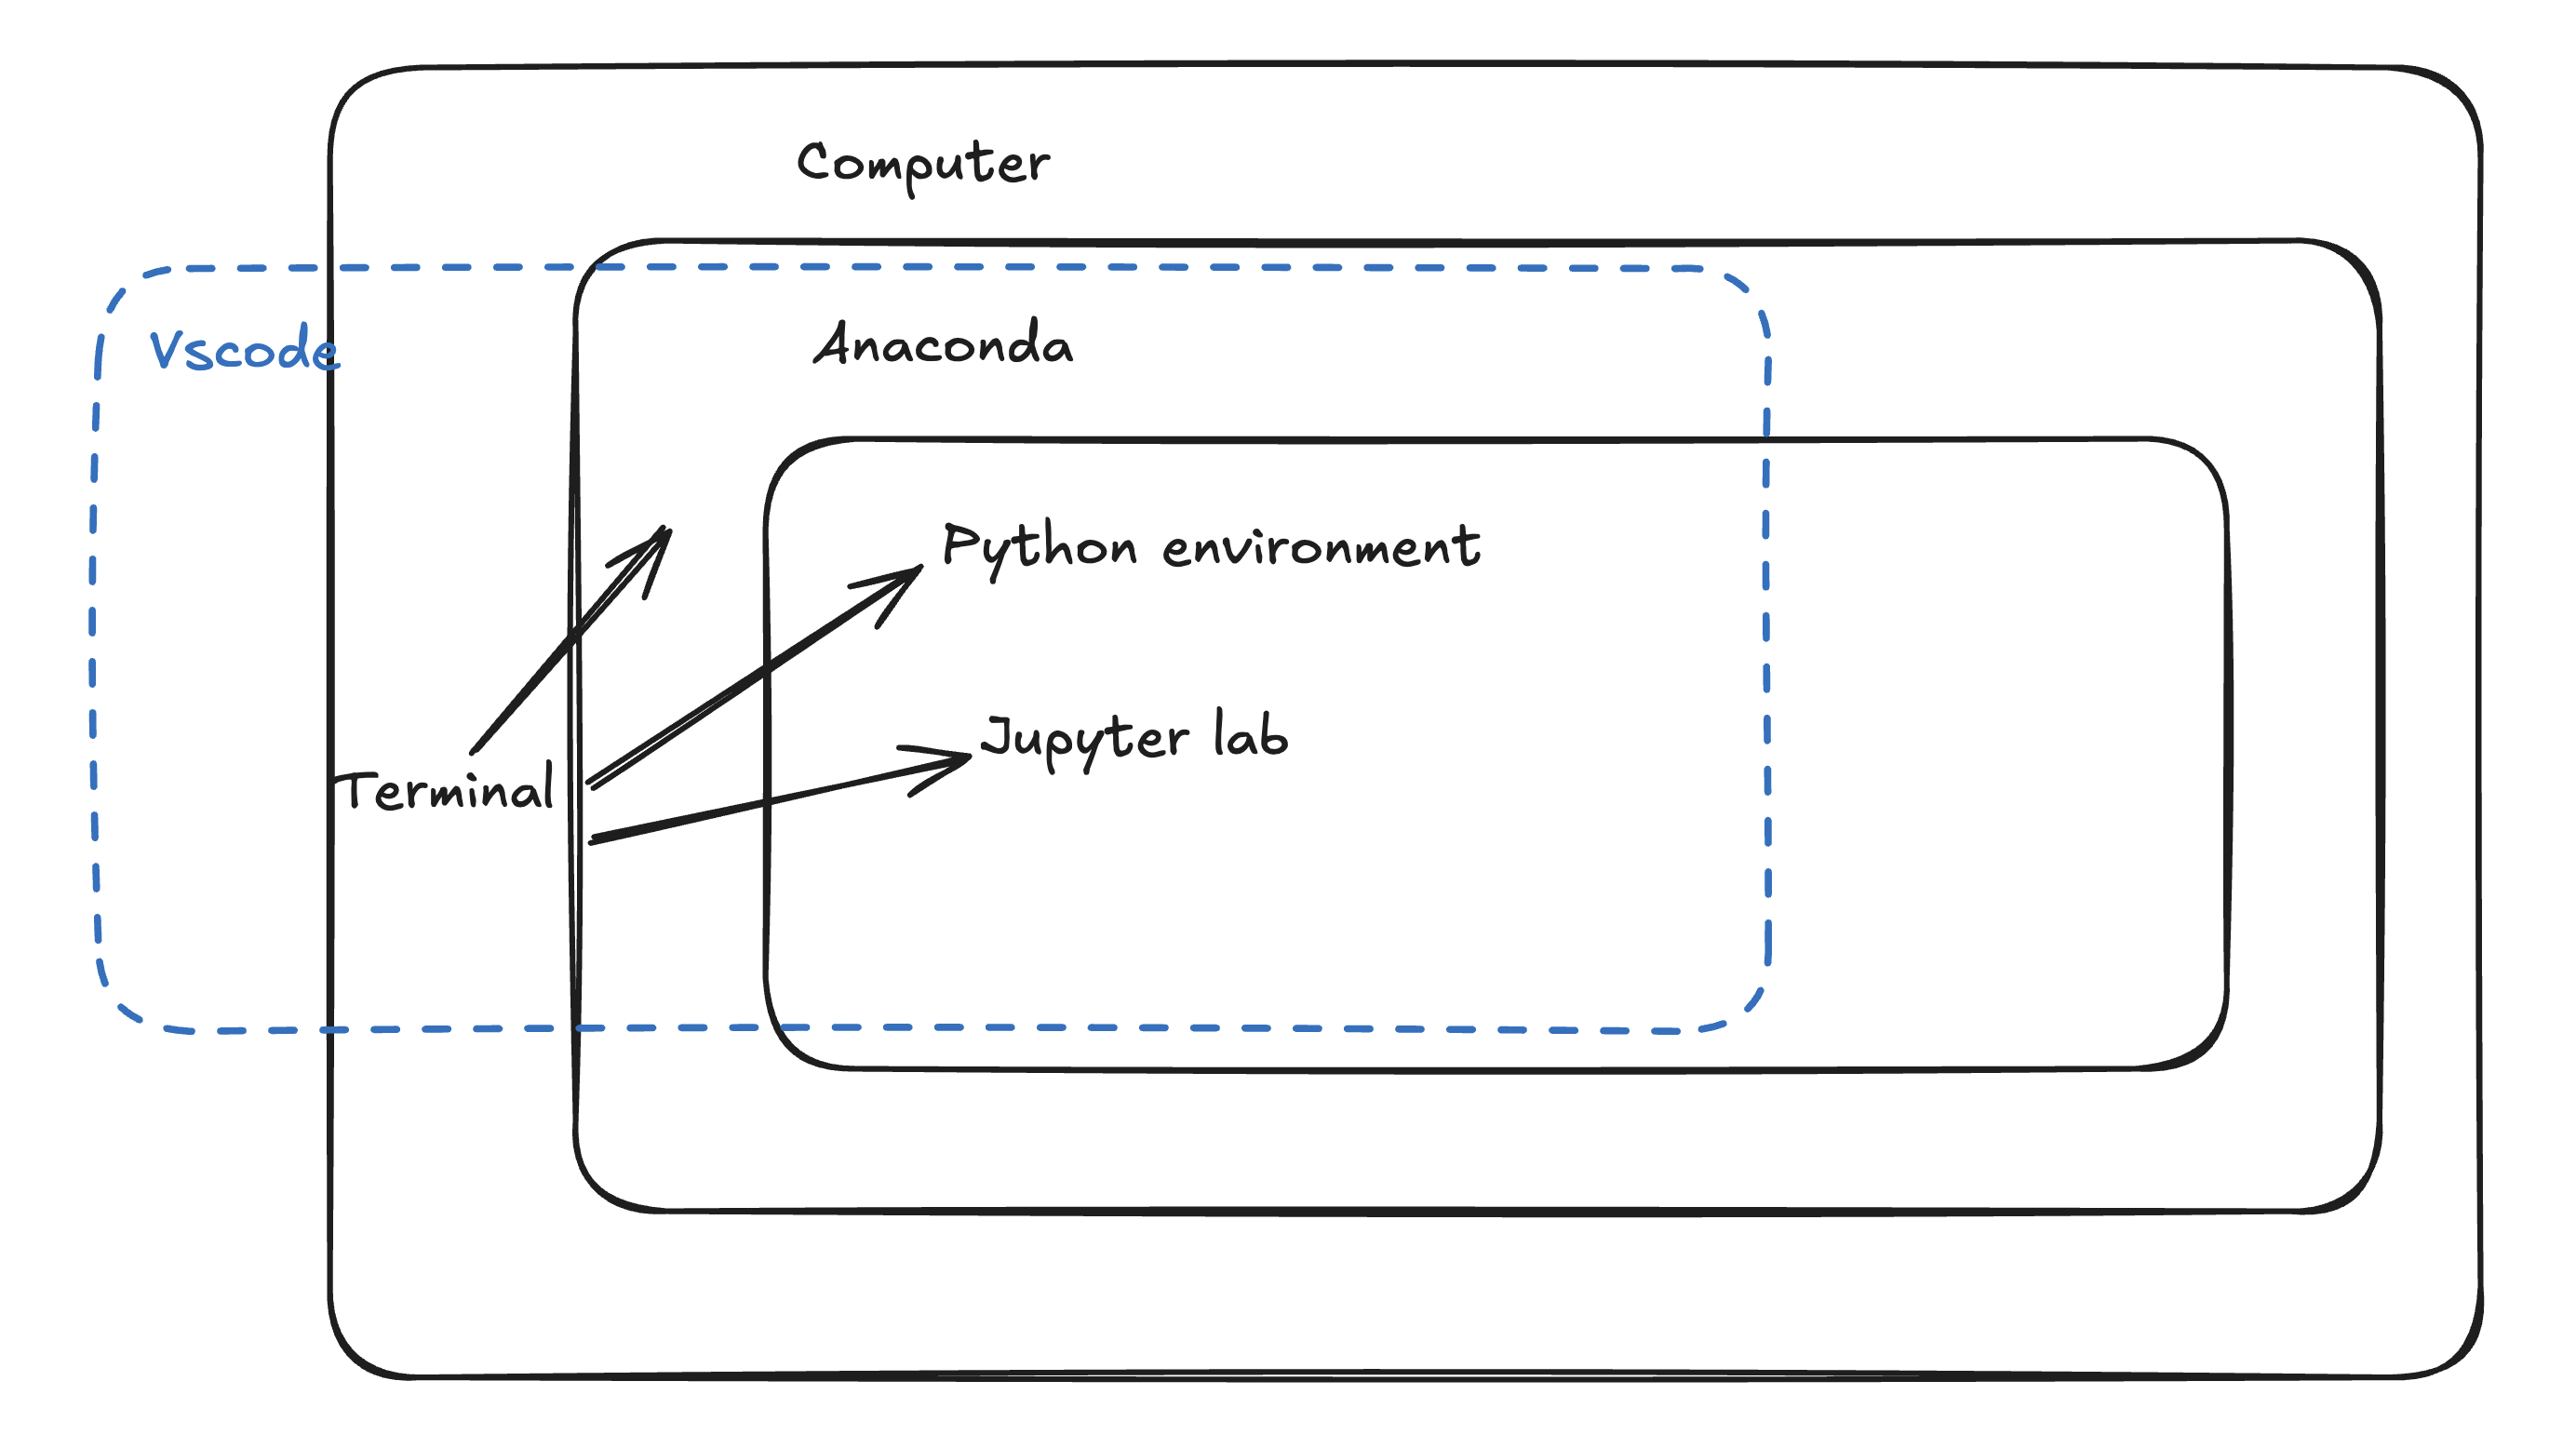
Fig. 1 In case you’re moving between both setups, this visual might be helpful to remind you of how they’re configured. Inside the “box” that is your computer’s file system, we installed Anaconda/Miniconda, which gives us the ability to create more “boxes” or isolated Python environments. Within one of these boxes (conda environment called 201b) we installed jupyterlab, so once we launch it, it’s runnning from within the 201b environment, thus using that version of Python and all the packages we installed.#
VSCode has the ability to “see” the boxes (environments) that Anaconda creates, but can happily move between environments if you point it to a different one. That’s why whenever we open a .ipynb file in VSCode we want to make sure to “select the kernel” which is telling VSCode what conda environment 201b to use that particular notebook file!
Optional goodies#
You might consider applying for a free Github student account which gives you access to a variety of additional resources and tools (e.g. using your VSCode setup remotely, using Github actions to run code automatically, etc)